Lab Sample Tracking for Test Labs: From Receipt to Disposal
Most of what’s written about lab sample tracking assumes a clinical lab: tubes of blood, a chain of custody that ends in a diagnosis, a freezer full of aliquots. Engineering and materials test labs track something different. A sample might be a hose assembly with a serial number, a tensile coupon that will be destroyed in testing, or a valve that goes through five tests over two months, gets sent out for failure analysis, and comes back to the requester’s desk.
Lab sample tracking is recording, for every physical sample, where it is, who has it, what has been done to it, and what happens to it when testing is over, all tied to the request it arrived with and the results it produced. It sounds simple, and in a spreadsheet it almost is, until someone asks where unit 4 went.
This guide walks through sample tracking the way an in-house test lab actually lives it, from the moment a request promises samples to the day the last box leaves the storage room.
What makes test-lab samples different
Clinical and life-science sample tracking is built around volume: thousands of similar containers, each tested once. Test labs at manufacturers have fewer samples, and each one carries more history:
- Samples are units, not containers. A part has a serial number, a lot, a drawing revision, and a material. Those traits decide which limits apply to its results.
- Testing happens in rounds. The same unit goes through proof pressure, then impulse cycling, then burst. One sample, several tests, sometimes several jobs.
- Some tests destroy the sample. A coupon pulled to failure doesn’t come back. Others don’t, and the unit gets re-tested next quarter on a different project.
- The requester usually wants something back. Internal engineers want failed units for teardown, passed units for their own records, or an answer to “can I have it back after the test?”
- Disposal is the step everyone forgets. Storage rooms in test labs fill up with boxes nobody remembers the reason for keeping.
A sample tracking process for a test lab has to handle all of that. Here’s the lifecycle, stage by stage.
1. Before the samples arrive
Sample tracking starts with the request, not at the receiving desk. The request should say how many samples are coming, what they are, when they’ll arrive, and what should happen to them after testing.
That last one matters more than it seems. If the requester decides up front whether the samples come back, get thrown away, or get stored for a while, the lab isn’t chasing anyone for an answer three weeks later with a shelf full of parts. In LIMSey, the job form carries a Sample Disposition field (return to requester, discard, store for a set number of days, or other, with a note) for exactly that reason.
Expected samples with an ETA also mean “where are my parts?” has an answer before anything arrives. Samples that are late show up as late instead of as a surprise.
2. Receipt
Receipt is where most sample tracking breaks. Samples arrive at a bench or a dock, someone sets them down, and the record of when they came in depends on whether that person remembered to update something.
Make receipt one action. In LIMSey, a scan station is a tablet or PC at the receiving desk: scan the QR code on the job’s traveler and the job moves into the station’s status, such as Received, optionally stamping a date like the actual sample delivery, with a record of who brought the samples in. If something is off, like a missing or damaged sample, a note typed at the station goes to the requester as a job comment. Scanning the same traveler twice is harmless; the station says the job was already received, and when.
Record deviations at receipt, not later. A cracked fitting noted when the box was opened is a fact. The same crack noticed after testing is an argument.
3. Identification and labels
Every sample needs an identity that survives being carried around a lab: a unique ID, plus the traits people use to describe it. For engineering samples that’s usually a serial number, a lot, a part number, and a material.
Labels are the physical half of that identity. A few things that make labels work in practice:
- Print the traits people actually look for, not just an ID. A label with the serial number in large type gets read; a label with a database key doesn’t.
- Use a QR code. Any phone camera reads one, so anyone can get from a sample on a bench to its record without a dedicated scanner.
- Match the label to the part. Die-cut sheets work for boxes and bags. A continuous tape printer (24 mm or 36 mm tape on a Brother P-Touch, for example) works for tubes, hoses, and parts too small for a sticker.
4. Storage and custody between tests
Between tests, samples sit somewhere. The tracking question is simple: where, and who has it? Statuses do most of the work here. A sample that is Arrived, In Storage, Checked Out, or Disposed tells everyone its state without a phone call. Check-in and check-out events with a purpose and a storage location turn that into a custody trail.
Write storage locations the way someone would look for them (“Room 114, shelf A”), and spell them the same way every time, so a search or a sort puts everything on one shelf together.
5. Testing: results recorded against the sample
Results belong to the sample they were measured on. When a technician enters a proof pressure, it should land on the row for that unit, in that task, with the limits for that unit’s material applied automatically. Pass and fail are then a property of the data, not a judgment typed in afterward.
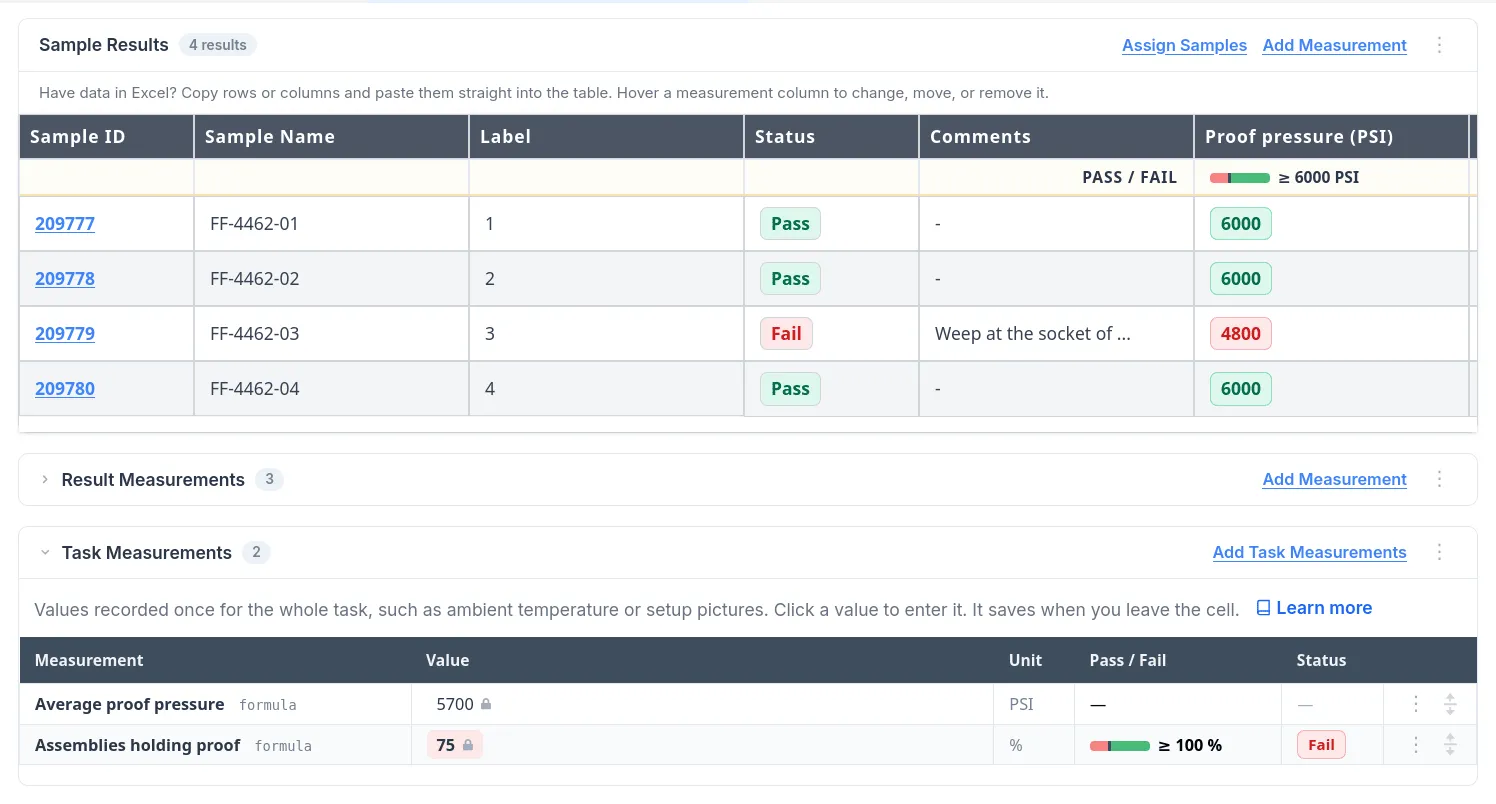
Two things make this hold up at the bench:
- Enter results where the test happens. A technician at a test stand shouldn’t be writing values on a glove and typing them in later. LIMSey’s phone view steps through a task one sample at a time, with the limits shown under each field.
- Keep instrument data from being re-typed. Pasting a block of values from Excel, or importing an instrument’s export file with a review step, beats retyping a column of numbers. Our instrument integration guide covers the options.
6. Re-tests, reuse, and the sample’s whole history
This is the part generic sample tracking guides skip, and the one that matters most in engineering labs: the same physical unit tested on more than one job.
There are two honest ways to model samples, and the right one depends on what your samples are:
| Samples belong to the job | Samples live in a shared library | |
|---|---|---|
| Fits | Coupons, panels, and parts consumed by the test | Serialized units re-tested across projects |
| Setup | None. Each job defines its own columns | Agree on shared trait names once |
| Re-testing a unit | Re-enter its details on the new job | Link the existing record into the new job |
| History of one unit | Spread across jobs | One record listing every job it has been in |
| Reporting across jobs by trait | Unreliable as column names drift | Consistent, since every job shares the same traits |
LIMSey supports both, chosen once per account. Our opinion: if your samples are mostly destroyed in testing, keep them on the job and don’t pay the setup cost. If the same units come back again and again, use the shared library. The first time someone asks “what has serial 4471 been through?”, one sample record with every job it has been in answers it in seconds.
7. Disposition and retention
Testing ends; the samples don’t disappear. Something has to happen to them, and someone has to record what.
The cleanest process we’ve seen has three parts:
- The requester chooses the disposition up front (step 1), with a default the lab can live with.
- The lab records what it actually did when testing is done: returned, discarded, stored, or something else (“sent to the failure analysis lab”). A job’s samples can go more than one way: store two boxes, return the failed units.
- Stored samples get a discard date. Every box on a shelf has a date it comes back up, so nothing is kept indefinitely by default.
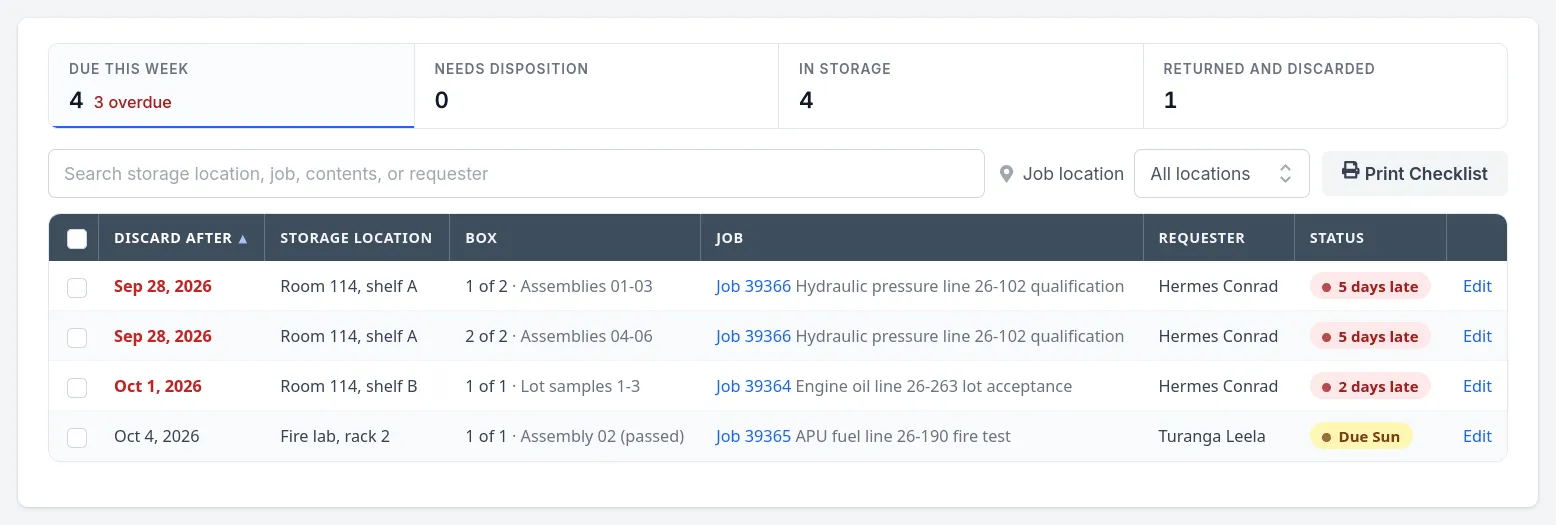
LIMSey’s Sample Storage, added in 41.0, works this way. Stored samples go into numbered boxes, each with a shelf location, a discard date, and a label with DISCARD AFTER in large type and a QR code that opens the box on its job. The Sample Storage screen lists the boxes due this week, late ones first, plus finished jobs whose samples still have no disposition. Storage managers get that list every Monday, and requesters get a notice a week before their boxes come due, in case they want to keep them longer. Print Checklist gives you a sheet to take into the storage room; tick the boxes, then mark them discarded together back at your desk.
How long should a test lab keep samples? There’s no universal number. ISO/IEC 17025 doesn’t set a retention period. Customers, contracts, and your own procedures do. What matters is that you have one: a default that covers most jobs (LIMSey starts accounts at 90 days), a way to ask for longer, and a list that tells someone when the time is up.
Where sample tracking meets ISO 17025
If your lab is accredited, sample tracking isn’t optional. Clause 7.4 of ISO/IEC 17025:2017, Handling of test or calibration items, asks for:
- A procedure for the transportation, receipt, handling, protection, storage, retention, and disposal or return of test items (7.4.1).
- An identification system that keeps items from being confused, physically or in records, for as long as they’re the lab’s responsibility (7.4.2).
- Recorded deviations at receipt, and consultation with the customer when there’s doubt about an item’s suitability (7.4.3).
- Maintained, monitored, and recorded storage conditions where they matter (7.4.4).
Each stage above maps to one of those. A sample tracking system that records receipt, labels, custody, and disposition with dates and names gives an assessor the evidence without anyone assembling it the night before. More on how LIMSey maps to the standard on our ISO 17025 page.
Why sample tracking spreadsheets break
Most labs start sample tracking in a spreadsheet, and that’s fine for a while. They tend to break in the same places:
- “Where is it now?” A spreadsheet holds the list, not the location. Custody lives in someone’s memory.
- Re-tested units get re-entered, and the serial number gets typed slightly differently each time.
- Results live in a different file, so linking a failed value back to the unit, its material, and its limits takes a person.
- Nobody clears the shelf. A spreadsheet doesn’t send anyone a Monday list.
- Several people edit it and there’s no record of who changed what.
If that list sounds familiar, our comparison of LIMSey and spreadsheets covers when it’s time to move.
What to look for in sample tracking software
For an engineering or materials test lab, sample tracking software should give you:
- Samples tied to the request and job they arrived with, with expected arrivals and ETAs
- Receipt in one action, by scanning a traveler or label, with deviations recorded at the door
- Custom sample traits (serial, lot, part number, material) and labels that print the ones you choose, on sheets or tape
- Statuses and check-in/check-out with storage locations, for a real custody trail
- Results recorded against each sample, with pass/fail judged automatically against limits that can depend on the material
- A choice between samples owned by the job and a shared library, so re-tested units keep one history
- Disposition and retention: what should happen, what did happen, and a discard date on everything stored
- Result entry from a phone at the test stand, without installing an app
- A complete audit trail of who changed what, and when
LIMSey is lab sample tracking software built for in-house engineering and materials test labs at manufacturers, with every feature included in one per-user price. If you’re comparing systems, our comparison of LIMS for engineering and materials test labs covers who else fits this kind of lab.
FAQ
What is lab sample tracking? Lab sample tracking is recording, for every physical sample, where it is, who has it, what has been done to it, and what happens to it when testing ends, tied to the request it came in with and the results it produced.
How do you track samples in a lab? Give each sample a unique ID and a label with a QR code when it arrives, record receipt against the request, use statuses and check-in/check-out to track custody between tests, record results against the sample, and record its disposition when testing is done. A LIMS does this in one place; a spreadsheet can hold the list but not the custody or the history.
How long should a test lab keep samples after testing? As long as your customers, contracts, and procedures require. ISO/IEC 17025 asks for a retention procedure but doesn’t set a period. A default retention period, a way to request longer, and a discard date on every stored box keep storage from growing forever.
Should sample labels use barcodes or QR codes? QR codes. Any phone camera can read one, so anyone in the lab can get from a sample to its record without a dedicated scanner, and a QR code fits on small labels and tape.
What’s the difference between sample tracking and sample management? The terms overlap. Sample tracking usually means following a sample’s location, custody, and status. Sample management usually adds what surrounds it: the sample’s traits, the tests run on it, its results, and its retention. In a test lab you need both, and they’re best in the same system.
Can you track samples in Excel? For a small lab, at first, yes. It stops working when you need to know where a sample is right now, test the same unit on more than one job, link results back to samples, or prove to an assessor who handled what. Those are the points where labs usually move to a LIMS.
If you’d like to see sample tracking in an engineering test lab, from the receiving desk to the storage room, book a demo.